
# cesium-裁剪3dTiles模型(多边形裁剪)
# 介绍
除了之前介绍的完整的裁切模型方式,我们有时还需不规则的去裁剪3dTiles模型
我这里业务需要裁剪模型中一部分位置
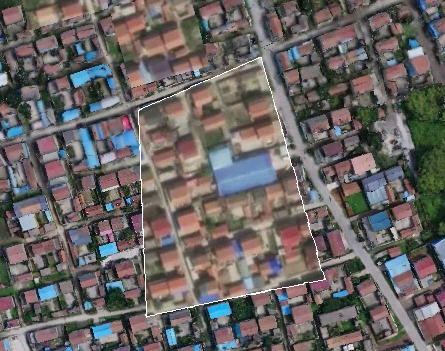
# 效果
先上效果
- 俯视效果
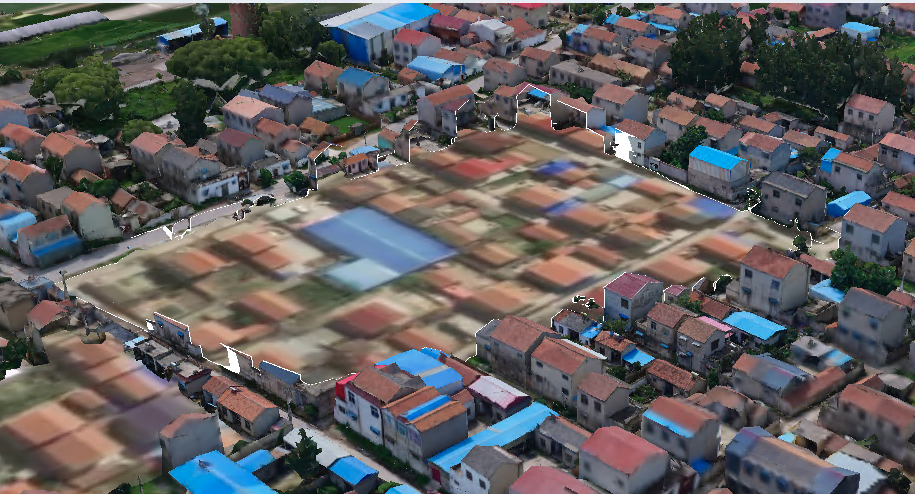
- 侧视效果
# 思路分析
- 确定一个垂直XOY面的法向量
let up = new Cesium.Cartesian3(0, 0, 10);
1
- 两点确定一个方向向量,由p2指向p1的向量
let right = Cesium.Cartesian3.subtract(p2C3, p1C3, new Cesium.Cartesian3());
1
- 计算normal, right叉乘up,得到平面法向量(垂直于两个向量),这个法向量指向right的左侧
let normal = Cesium.Cartesian3.cross(right, up, new Cesium.Cartesian3());
normal = Cesium.Cartesian3.normalize(normal, normal);
1
2
2
- 由于已经获得了法向量和过平面的一点,因此可以直接构造Plane,并进一步构造ClippingPlane
let planeTmp = Cesium.Plane.fromPointNormal(p1C3, normal);
return Cesium.ClippingPlane.fromPlane(planeTmp);
1
2
2
- 将生成的裁切面集合添加给模型
# 完整代码
这里使用vue代码实现,HTML实现类似
<template>
  <div class="home">
    <el-row type="flex" :gutter="20">
      <el-col :span="24">
        <div class="grid-content bg-purple">
          <el-breadcrumb separator="/">
            <el-breadcrumb-item>cesium</el-breadcrumb-item>
            <el-breadcrumb-item>裁剪功能</el-breadcrumb-item>
            <el-breadcrumb-item>3DTiles裁剪(单个多边形)</el-breadcrumb-item>
            <el-breadcrumb-item>方法一(推荐)</el-breadcrumb-item>
          </el-breadcrumb>
        </div>
      </el-col>
    </el-row>
    <el-row type="flex" :gutter="20">
      <el-col :span="24">
        <div class="grid-content bg-purple">
          <cesiumComponent id="cesium" ref="refCesium"/>
        </div>
      </el-col>
    </el-row>
    <el-row type="flex" :gutter="20">
      <el-col :span="24">
        <div class="grid-content bg-purple">
          <el-button type="primary" @click="cameraLookAtTransform()">视角复位</el-button>
          <el-button type="primary" @click="showBoundVolumes()">开关边界体积</el-button>
        </div>
      </el-col>
    </el-row>
  </div>
</template>

<script>
import cesiumComponent from '../cesium.vue'

export default {
  name: "clipping_3dTile_polygon",
  data() {
    return {
      _viewer: undefined,
      _scene: undefined,
      _camera: undefined,
      targetY: 0.0,
      tileset: undefined,
      tileUrl: "../tileset.json",
      clippingPlanes: undefined,
      selectedPlane: undefined,
      showBound: false,
      polygon: [
        [
          117.44834303855897,
          34.37801246980093
        ],
        [
          117.44802117347719,
          34.37690560837309
        ],
        [
          117.4492335319519,
          34.37684362370057
        ],
        [
          117.4492174386978,
          34.37811430031746
        ],
        [
          117.44834303855897,
          34.37801246980093
        ]
      ],
    };
  },
  components: {
    cesiumComponent
  },
  mounted() {
    this.init();
    this.addTiles();
  },
  methods: {
    init() {
      let that = this;
      that.$refs.refCesium.initMap();
      that._viewer = that.$refs.refCesium._viewer;
      that._camera = that._viewer.camera;
      that._scene = that._viewer.scene;
    },
    /**
     * 修改平面的高度
     */
    createPlaneUpdateFunction(plane) {
      let that = this;
      return function () {
        // plane.distance = that.targetY;
        return plane;
      };
    },
    /**
     * 添加3dTiles模型
     */
    addTiles() {
      let that = this;
      let viewer = that._viewer;
      let tileset = that.tileset;
      // 3dTiles模型初始化位置的矩阵
      let Matrix4 = Cesium.Matrix4.fromArray(
          [1, 5.551115123125783e-16, 5.898416033378595e-9, 0,
            -6.106226635438361e-16, 1, -1.1355608731111744e-8, 0,
            -5.898416061134171e-9, 1.1355608731111744e-8, 0.9999999999999999, 0,
            9.912469893228263, -19.08345020748675, -14.613607150502503, 1]
      );

      // 3dTiles模型加载后的矩阵,可以f12打印查看:tileset.root.transform
      let transform = Cesium.Matrix4.fromArray(
          [-0.8874246461620654, -0.46095281470464317, 0, 0,
            0.2602796082288922, -0.5010893346724129, 0.8253266045740758, 0,
            -0.3804366214290463, 0.7324151700322881, 0.5646556435405804, 0,
            -2429070.591483741, 4676437.67731705, 3581165.448379543, 1]);

      //转换矩阵
      let inverseTransform = Cesium.Matrix4.inverseTransformation(transform, new Cesium.Matrix4());
      // clippingPlane集合
      let clippingPlanes1 = [];
      for (let i = 0; i < that.polygon.length - 1; i++) {
        let plane = that.createPlane(that.polygon[i], that.polygon[i + 1], inverseTransform);
        clippingPlanes1.push(plane);
      }
      // 创建裁剪平面
      let clippingPlanes = new Cesium.ClippingPlaneCollection({
        //一组ClippingPlane对象,用于选择性地禁用每个平面外部的渲染。
        planes: clippingPlanes1,
        //应用于裁剪对象的边缘的高光的宽度(以像素为单位)
        edgeWidth: 1.0,
      });
      that.clippingPlanes = clippingPlanes;
      tileset = new Cesium.Cesium3DTileset({
        url: that.tileUrl,
        clippingPlanes: clippingPlanes,
        unionClippingRegions: true,
        modelMatrix: Matrix4,
      });
      that.tileset = tileset;
      viewer.scene.primitives.add(tileset);
      viewer.zoomTo(tileset);
      console.log(tileset);
      // 开启深度检测
      // viewer.scene.globe.depthTestAgainstTerrain = true;


      // 当模型准备好时执行
      return tileset.readyPromise
          .then(function () {
            let boundingSphere = tileset.boundingSphere;//外包球
            let radius = boundingSphere.radius; //外包球半径

            // 定位到模型,并设置相机的俯仰角和距离
            viewer.zoomTo(
                tileset,
                new Cesium.HeadingPitchRange(0.5, -0.2, radius * 4.0)
            );
            Cesium.Matrix4.multiplyByPoint(transform, boundingSphere.center, new Cesium.Cartesian3(0, 0, 0))
            return tileset;
          })

    },
    /**
     * 设置相机的视角
     */
    cameraLookAtTransform() {
      let that = this;
      let boundingSphere = that.tileset.boundingSphere;
      that._camera.viewBoundingSphere(boundingSphere, new Cesium.HeadingPitchRange(Cesium.Math.toRadians(120.0), Cesium.Math.toRadians(-10), boundingSphere.radius * 2.5))
      that._camera.lookAtTransform(Cesium.Matrix4.IDENTITY)
    },
    /**
     *  开关展示边界体积
     */
    showBoundVolumes() {
      let that = this;
      if (!that.showBound) {
        that.tileset.debugShowContentBoundingVolume = true;
        that.showBound = true;
      } else {
        that.tileset.debugShowContentBoundingVolume = false;
        that.showBound = false;
      }
    },
    /**
     * 对点进行坐标转换
     * @param point 点坐标 数组形式
     * @param inverseTransform 转换举证
     * @returns {*} ClippingPlane 裁切面
     */
    getOriginCoordinateSystemPoint(point, inverseTransform) {
      let val = Cesium.Cartesian3.fromDegrees(point[0], point[1])
      return Cesium.Matrix4.multiplyByPoint(
          inverseTransform, val, new Cesium.Cartesian3(0, 0, 0))
    },
    /**
     * 创建裁剪面
     * @param p1 起始点
     * @param p2 结束点
     * @param inverseTransform 矩阵
     * @returns {*} ClippingPlane裁剪面(面法向量,点到面的垂直距离)
     */
    createPlane(p1, p2, inverseTransform) {
      let that = this;
      // 将仅包含经纬度信息的p1,p2,转换为相应坐标系的cartesian3对象
      let p1C3 = that.getOriginCoordinateSystemPoint(p1, inverseTransform)
      let p2C3 = that.getOriginCoordinateSystemPoint(p2, inverseTransform)

      // 定义一个垂直向上的向量up
      let up = new Cesium.Cartesian3(0, 0, 10)
      //  right 实际上就是由p1指向p2的向量 (这里是p2--》p1)
      let right = Cesium.Cartesian3.subtract(p2C3, p1C3, new Cesium.Cartesian3())
      // 计算normal, right叉乘up,得到平面法向量(垂直于两个向量),这个法向量指向right的右侧
      let normal = Cesium.Cartesian3.cross(right, up, new Cesium.Cartesian3())
      normal = Cesium.Cartesian3.normalize(normal, normal)

      //由于已经获得了法向量和过平面的一点,因此可以直接构造Plane,并进一步构造ClippingPlane
      let planeTmp = Cesium.Plane.fromPointNormal(p1C3, normal)
      return Cesium.ClippingPlane.fromPlane(planeTmp)
    },
  },
  created() {

  },
}
</script>

<style scoped>
.home {
  height: 100%;
  margin: 0;
  padding: 0;
  overflow-y: auto;
  overflow-x: hidden;
}

.el-breadcrumb {
  margin: 10px;
  font-size: 15px;
}

#cesium {
  max-height: 500px;
}
</style>
1
2
3
4
5
6
7
8
9
10
11
12
13
14
15
16
17
18
19
20
21
22
23
24
25
26
27
28
29
30
31
32
33
34
35
36
37
38
39
40
41
42
43
44
45
46
47
48
49
50
51
52
53
54
55
56
57
58
59
60
61
62
63
64
65
66
67
68
69
70
71
72
73
74
75
76
77
78
79
80
81
82
83
84
85
86
87
88
89
90
91
92
93
94
95
96
97
98
99
100
101
102
103
104
105
106
107
108
109
110
111
112
113
114
115
116
117
118
119
120
121
122
123
124
125
126
127
128
129
130
131
132
133
134
135
136
137
138
139
140
141
142
143
144
145
146
147
148
149
150
151
152
153
154
155
156
157
158
159
160
161
162
163
164
165
166
167
168
169
170
171
172
173
174
175
176
177
178
179
180
181
182
183
184
185
186
187
188
189
190
191
192
193
194
195
196
197
198
199
200
201
202
203
204
205
206
207
208
209
210
211
212
213
214
215
216
217
218
219
220
221
222
223
224
225
226
227
228
229
230
231
232
233
234
235
236
237
238
239
240
241
242
243
244
245
246
247
248
# 核心代码
    /**
     * 对点进行坐标转换
     * @param point 点坐标 数组形式
     * @param inverseTransform 转换举证
     * @returns {*} ClippingPlane 裁切面
     */
    getOriginCoordinateSystemPoint(point, inverseTransform) {
      let val = Cesium.Cartesian3.fromDegrees(point[0], point[1])
      return Cesium.Matrix4.multiplyByPoint(
          inverseTransform, val, new Cesium.Cartesian3(0, 0, 0))
    },
    /**
     * 创建裁剪面
     * @param p1 起始点
     * @param p2 结束点
     * @param inverseTransform 矩阵
     * @returns {*} ClippingPlane裁剪面(面法向量,点到面的垂直距离)
     */
    createPlane(p1, p2, inverseTransform) {
      let that = this;
      // 将仅包含经纬度信息的p1,p2,转换为相应坐标系的cartesian3对象
      let p1C3 = that.getOriginCoordinateSystemPoint(p1, inverseTransform)
      let p2C3 = that.getOriginCoordinateSystemPoint(p2, inverseTransform)

      // 定义一个垂直向上的向量up
      let up = new Cesium.Cartesian3(0, 0, 10)
      //  right 实际上就是由p1指向p2的向量 (这里是p2--》p1)
      let right = Cesium.Cartesian3.subtract(p2C3, p1C3, new Cesium.Cartesian3())
      // 计算normal, right叉乘up,得到平面法向量(垂直于两个向量),这个法向量指向right的右侧
      let normal = Cesium.Cartesian3.cross(right, up, new Cesium.Cartesian3())
      normal = Cesium.Cartesian3.normalize(normal, normal)

      //由于已经获得了法向量和过平面的一点,因此可以直接构造Plane,并进一步构造ClippingPlane
      let planeTmp = Cesium.Plane.fromPointNormal(p1C3, normal)
      return Cesium.ClippingPlane.fromPlane(planeTmp)
    },
1
2
3
4
5
6
7
8
9
10
11
12
13
14
15
16
17
18
19
20
21
22
23
24
25
26
27
28
29
30
31
32
33
34
35
36
2
3
4
5
6
7
8
9
10
11
12
13
14
15
16
17
18
19
20
21
22
23
24
25
26
27
28
29
30
31
32
33
34
35
36
# 在线示例
# 待解决问题
- 这里只能裁剪凸多边形,凹多边形还不行
- 3dtiles模型裁剪只能裁剪一个,不能多裁剪