
# ElasticSearch
Elasticsearch是一个基于Lucene的搜索服务器。它提供了一个分布式多用户能力的全文搜索引擎,基于RESTful web接口。Elasticsearch是用Java语言开发的,并作为Apache许可条款下的开放源码发布,是一种流行的企业级搜索引擎。Elasticsearch用于云计算中,能够达到实时搜索,稳定,可靠,快速,安装使用方便。官方客户端在Java、.NET(C#)、PHP、Python、Apache Groovy、Ruby和许多其他语言中都是可用的。
官网地址:
- https://www.elastic.co/cn/elasticsearch/
# 单体安装
# 下载
点击下载按钮,选择合适自己系统的版本下载
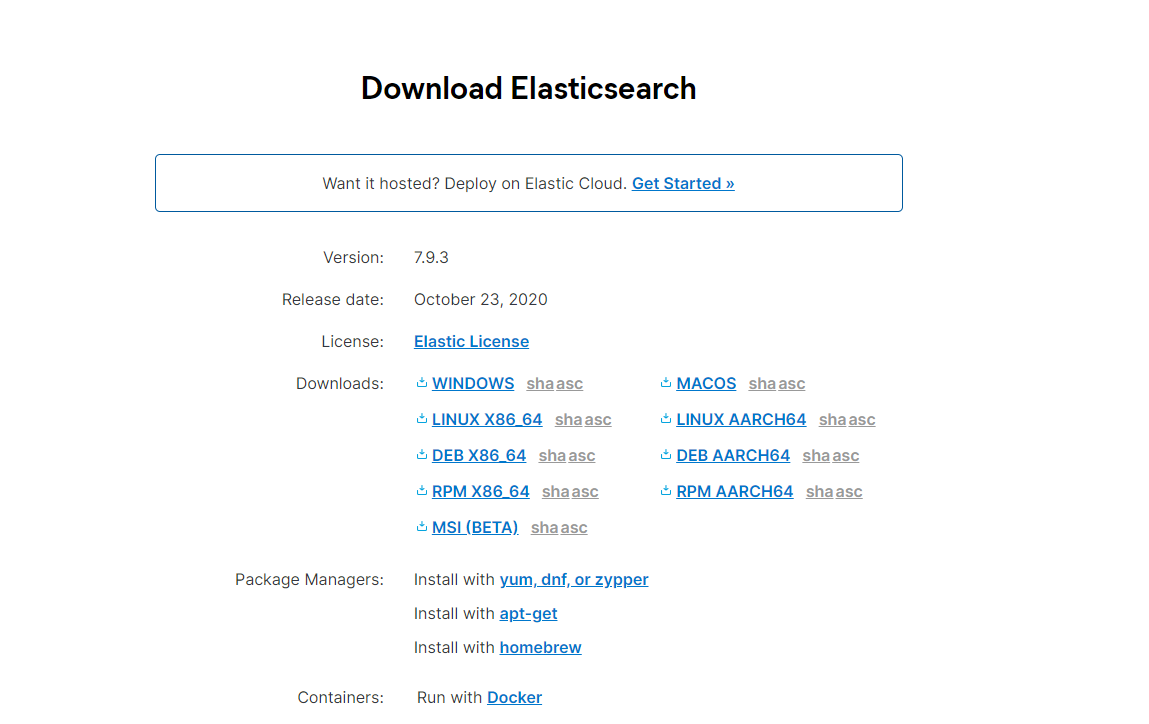
我使用的是centos7,所以下载Linux X86_64下载,进行手动配置安装
# 软件压缩包上传解压
- 将下载好的安装包使用ftp工具上传到服务器上

将安装包移动到/user/local/soft目录下
sudo mv elasticsearch-7.9.3-linux-x86_64.tar.gz /usr/local/soft1解压文件
sudo tar -zxvf elasticsearch-7.9.3-linux-x86_64.tar.gz1

进入文件夹的bin目录
cd elasticsearch-7.9.3/bin1
# 启动elasticsearch
启动elasticsearch
需要安装java环境,elasticsearch不能使用root用户进行启动,需要切换到其他用户来启动,并赋予用户权限
# 创建用户
sudo adduser es
# 给用户创建密码
sudo passwd es 123456
# 将elasticsearch文件夹授权给es用户
sudo chown -R es:es /usr/local/soft/elasticsearch-7.9.3

# 將data文件夹授权给es用户
sudo chown -R es:es /data/es
# 切换用户,并输入密码
su es
# 进入elasticsearch文件夹的bin目录
cd /usr/local/soft/elasticsearch-7.9.3/bin
# 启动elasticsearch
./elasticsearch
1
2
3
4
5
6
7
8
9
10
11
12
13
14
15看见started就说明成功启动

正常启动的时候会让es进入后台运行,命令如下
./elasticsearch &1使用jps命令查看es是否正常运行
jps1
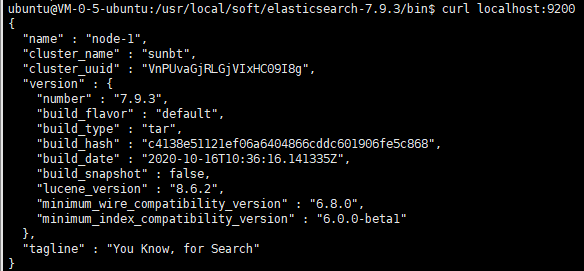
# 查看es状态
此时,es便可以在本地访问了,端口号为9200
curl localhost:9200
# 安装elasticsearch-head
git clone git://github.com/mobz/elasticsearch-head.gitcd elasticsearch-headnpm installnpm run start

# 集群安装
| 主机 | 角色 | hostname |
|---|---|---|
| 192.168.101.10 | 主/从节点 | node1 |
| 192.168.101.11 | 主/从节点 | node2 |
| 192.168.101.12 | 主/从节点 | node3 |
- 一主二从
- 开放端口为(9200和9300--在实际的生产中可以指定为其他端口)
# 配置
版本:7以上
参考配置
cluster.name: libbelasticsearch

node.name: "es128"

node.master: true

node.data: true

path.data: /opt/elasticsearch-7.0.0/data

path.logs: /opt/elasticsearch-7.0.0/logs

network.host: 192.168.1.128

transport.tcp.port: 9300

transport.tcp.compress: true

http.port: 9200

http.max_content_length: 100mb

bootstrap.memory_lock: true

discovery.seed_hosts: ["192.168.1.128","192.168.1.135","192.168.1.136"]

cluster.initial_master_nodes: ["192.168.1.128","192.168.1.135","192.168.1.136"]

gateway.recover_after_nodes: 2

gateway.recover_after_time: 5m

gateway.expected_nodes: 3
2
3
4
5
6
7
8
9
10
11
12
13
14
15
16
17
18
19
20
21
22
23
24
25
26
27
28
29
30
31
32
33
# node1
编辑配置文件
vim /usr/local/es/elasticsearch-7.10.1/config/elasticsearch.yml
具体内容
# 配置跨域设置
http.cors.enabled: true
http.cors.allow-origin: "*"
#配置es的集群名称,默认是elasticsearch,
#es会自动发现在同一网段下的es,
# 如果在同一网段下有多个集群,就可以用这个属性来区分不同的集群。
cluster.name: es
node.name: node1
node.master: true
node.data: true
path.data: /data/es/data
path.logs: /data/es/log
network.host: 0.0.0.0
http.port: 9200
transport.tcp.port: 9300
discovery.seed_hosts: ["192.168.101.10:9300","192.168.101.11:9300","192.168.101.12:9300"]
cluster.initial_master_nodes: ["192.168.101.10:9300","192.168.101.11:9300","192.168.101.12:9300"]
2
3
4
5
6
7
8
9
10
11
12
13
14
15
16
17
# node2
编辑配置文件
vim /usr/local/es/elasticsearch-7.10.1/config/elasticsearch.yml
具体内容
# 配置跨域设置
http.cors.enabled: true
http.cors.allow-origin: "*"
#配置es的集群名称,默认是elasticsearch,
#es会自动发现在同一网段下的es,
# 如果在同一网段下有多个集群,就可以用这个属性来区分不同的集群。
cluster.name: es
node.name: node2
node.master: true
node.data: true
path.data: /data1/es/data
path.logs: /data1/es/log
network.host: 0.0.0.0
http.port: 9200
transport.tcp.port: 9300
discovery.seed_hosts: ["192.168.101.10:9300","192.168.101.11:9300","192.168.101.12:9300"]
cluster.initial_master_nodes: ["192.168.101.10:9300","192.168.101.11:9300","192.168.101.12:9300"]
2
3
4
5
6
7
8
9
10
11
12
13
14
15
16
17
# node3
编辑配置文件
vim /usr/local/es/elasticsearch-7.10.1/config/elasticsearch.yml
具体内容
# 配置跨域设置
http.cors.enabled: true
http.cors.allow-origin: "*"
#配置es的集群名称,默认是elasticsearch,
#es会自动发现在同一网段下的es,
# 如果在同一网段下有多个集群,就可以用这个属性来区分不同的集群。
cluster.name: es
node.name: node3
node.master: true
node.data: true
path.data: /data1/es/data
path.logs: /data1/es/log
network.host: 0.0.0.0
http.port: 9200
transport.tcp.port: 9300
discovery.seed_hosts: ["192.168.101.10:9300","192.168.101.11:9300","192.168.101.12:9300"]
cluster.initial_master_nodes: ["192.168.101.10:9300","192.168.101.11:9300","192.168.101.12:9300"]
2
3
4
5
6
7
8
9
10
11
12
13
14
15
16
17
然后分别启动 slave01 和 slave02。启动后,可以在 head 插件上查看集群信息。
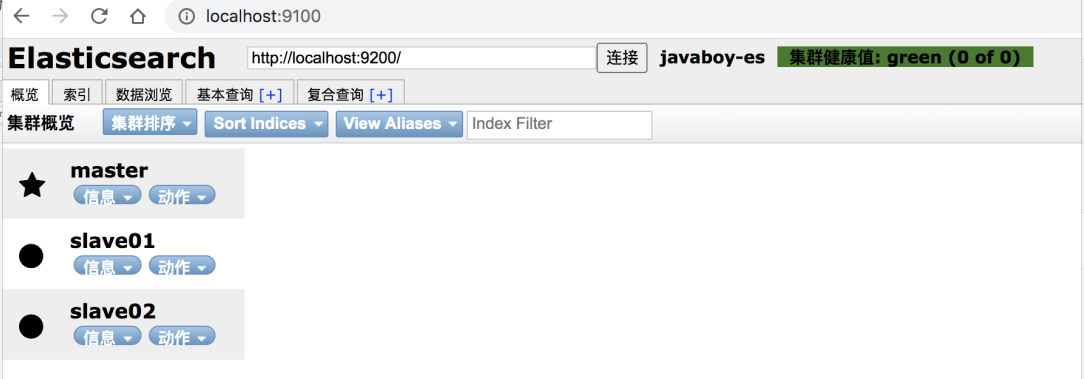
集群状态:
http://localhost:9200/_cluster/health?pretty
# 低版本
版本:5
# 配置
http.cors.enabled: true
http.cors.allow-origin: "*"

path.data: /home/edison/ES-01/data1

#节点1的配置信息:
#集群名称,保证唯一
cluster.name: my-elasticsearch
#节点名称,必须不一样
node.name: node-1
#必须为本机的ip地址
network.host: 192.168.1.251
#服务端口号,在同一机器下必须不一样
http.port: 9200
#集群间通信端口号,在同一机器下必须不一样
transport.tcp.port: 9300
#设置集群自动发现机器ip集合
discovery.zen.ping.unicast.hosts: ["192.168.1.251:9300","192.168.1.252:9300","192.168.1.253:9300"]
2
3
4
5
6
7
8
9
10
11
12
13
14
15
16
17
18
# Kibana 安装
Kibana 是一个 Elastic 公司推出的一个针对 es 的分析以及数据可视化平台,可以搜索、查看存放在 es 中的数据。
安装步骤如下:
- 下载 Kibana:https://www.elastic.co/cn/downloads/kibana
- 解压
- 配置 es 的地址信息(可选,如果 es 是默认地址以及端口,可以不用配置,具体的配置文件是 config/kibana.yml)
- 执行 ./bin/kibana 文件启动
- localhost:5601
Kibana 安装好之后,首次打开时,可以选择初始化 es 提供的测试数据,也可以不使用。
Kibana 安装好之后,首次打开时,可以选择初始化 es 提供的测试数据,也可以不使用。
# 问题处理
# 虚拟内存报错
- [max virtual memory areas vm.max_map_count [65530] is too low, increase to at least [262144]
提高虚拟内存大小
切换到root用户下
# 设置虚拟内存大小
sysctl -w vm.max_map_count=262144
# 查看设置后的结果
sysctl -a|grep vm.max_map_count


# 永久修改方式,在/etc/sysctl.conf文件最后添加一行
vm.max_map_count=262144
2
3
4
5
6
7
8
# 配置集群名称和节点名称
打开 config/elasticsearch.yml 文件,可以配置集群名称以及节点名称。
cluster.name: sunbt
node.name: master
2
# 开启远程访问
- 先设置虚拟内存
- 修改elasticsearch.yml
network.host: 0.0.0.0
# 其中nede为节点的名称
cluster.initial_master_nodes: ["node-1", "node-2"]
2
3
# 解决跨域问题
- 修改elasticsearch.yml
http.cors.enabled: true
http.cors.allow-origin: "*"
2
# 启动错误
# 错误一

将当前用户的软硬限制调大。
找到文件 vim /etc/security/limits.conf,编辑,在文件的最后追加如下配置:
es soft nofile 65535
es hard nofile 65537
2
soft nofile表示软限制,hard nofile表示硬限制,
上面两行语句表示,es用户的软限制为65535,硬限制为65537,
查看当前用户的软限制
命令:ulimit -n 等价于 ulimit -S -n
结果:65535
查看当前用户的硬限制
命令:ulimit -H -n
结果:65537
# 错误二

设置/etc/security/limits.conf
vim /etc/security/limits.conf
* soft nproc 5000
* hard nproc 5000
2